Juvelook Before and After — What Results Actually Look Like at Week 2, Month 3, and Month 12
Last updated: July 2026 · Reading time: 6 min
Quick Answer
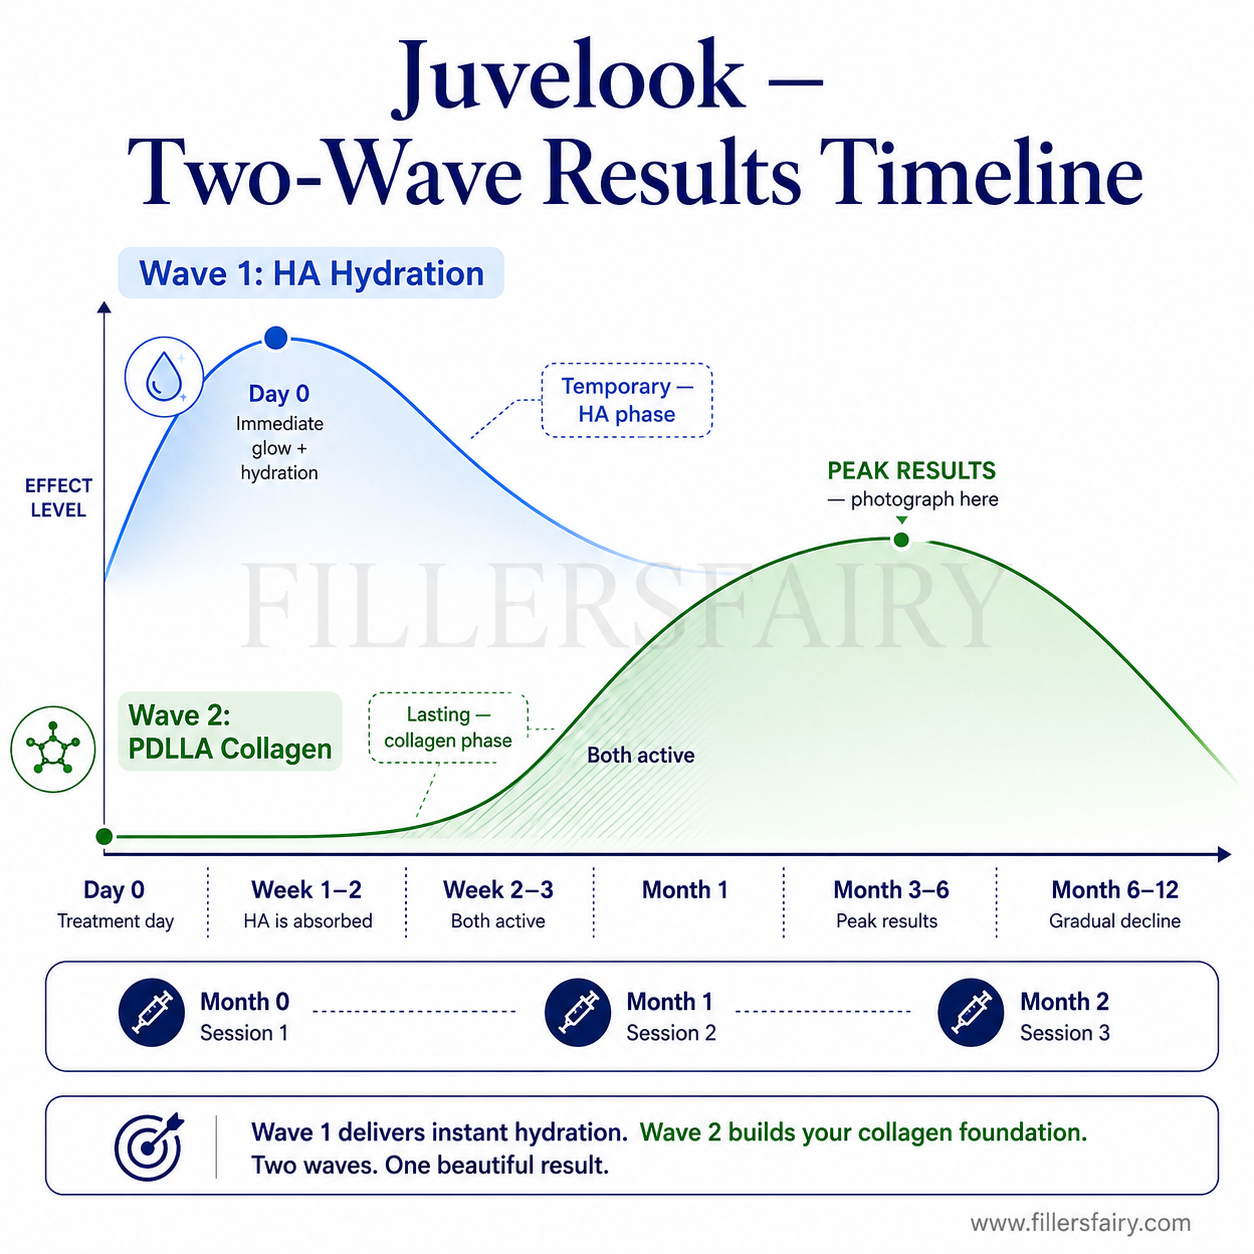
Juvelook results happen in two waves. The first wave is immediate — HA-driven hydration and glow visible from Day 1. The second wave builds gradually as PDLLA microparticles stimulate collagen production over weeks 2–12. Peak results appear around Month 3–6 after completing the standard 3-session course. Duration is 6–12 months for Juvelook 50mg, longer for Volume. The before-and-after difference practitioners measure includes improved skin elasticity, reduced fine lines, tighter pores, and a visible “from-within” luminosity that fillers and HA boosters alone cannot replicate — because the improvement comes from the patient’s own new collagen, not from a product sitting in the skin.
The Two-Wave Results Timeline
Juvelook’s results unfold differently from any other injectable because two ingredients are working on two different timelines. Understanding this dual timeline is essential for both practitioner communication and patient satisfaction.
| Time Point | What the Patient Sees | What’s Happening Biologically |
|---|---|---|
| Day 0–3 | Skin looks plumper, hydrated, and slightly glowing. Mild swelling or redness at injection sites. | HA binds water in the dermis. PDLLA microparticles are in place but inactive. Mild inflammatory response begins the healing cascade. |
| Week 1–2 | Initial swelling resolves. Skin settles into a natural hydration baseline. Some patients feel it “didn’t do much” — this is normal. | HA is being gradually absorbed. PDLLA microparticles begin interacting with fibroblasts. Collagen stimulation is starting but not yet visible. |
| Week 2–4 (+ Session 2) |
Skin texture starts improving. Pores appear smaller. Fine lines begin to soften. The “from-within glow” becomes noticeable. | New collagen fibres are forming. Fibroblast activity is elevated. Session 2 adds a fresh round of PDLLA on top of the ongoing stimulation. |
| Month 2–3 (+ Session 3) |
Visible improvement in elasticity. Skin bounces back when pressed. Fine lines are notably softer. Skin tone evens out. | Three rounds of PDLLA are now active simultaneously. Collagen density is measurably increased. Elastin production accelerates. |
| Month 3–6 (Peak results) |
Maximum improvement. Skin firmness, texture, and luminosity at their best. This is the optimal window for before-and-after photography. | New collagen matrix is mature and integrated. PDLLA from Session 1 is fully biodegraded. Session 2 and 3 PDLLA continues working. |
| Month 6–12 | Results gradually soften as the collagen matrix slowly turns over. Most patients maintain good skin quality through Month 9–12. Maintenance session recommended at Month 6–9. | All PDLLA is biodegraded. The collagen it stimulated remains but undergoes normal biological turnover. A maintenance session restarts the stimulation cycle. |
Results by Skin Concern
Not every skin concern responds at the same speed or to the same degree. The timeframes below are typical ranges based on collagen biology and clinical observation — individual results will vary. Setting area-specific expectations prevents the “it didn’t work for X” complaint.
| Skin Concern | Visible Improvement | Peak Result | Degree of Change |
|---|---|---|---|
| Fine lines (periorbital, perioral) | Week 3–4 | Month 3 | Significant softening |
| Enlarged pores | Week 4–6 | Month 3–4 | Noticeable pore tightening |
| Skin elasticity loss | Week 6–8 | Month 4–6 | Measurable improvement (skin bounces back) |
| Dull, dehydrated skin | Day 1 (HA phase) | Immediate → sustained with collagen | Dramatic glow improvement |
| Mild acne scarring | Month 2–3 | Month 4–6 | Moderate improvement (collagen fills depressed scars) |
| Nasolabial folds (Volume) | Week 2–3 | Month 3 | Moderate (not as dramatic as HA filler) |
Key insight: The concerns that improve fastest — hydration and glow — are HA-driven and temporary. The concerns that improve most significantly — elasticity, fine lines, pores — are PDLLA-driven and lasting. Setting this expectation at consultation prevents the “the glow faded after two weeks” disappointment.
What Changes After Each Session
After Session 1: Patients see an immediate hydration boost that gradually fades over the first few weeks as the HA is absorbed. Some feel underwhelmed. This is normal — the collagen stimulation is happening beneath the surface but isn’t yet visible. The practitioner’s job here is reassurance.
After Session 2: The cumulative effect begins. Collagen from Session 1’s PDLLA starts becoming visible as improved texture and early fine-line softening. Session 2’s HA provides another hydration boost, and its PDLLA adds a second layer of collagen stimulation. Most patients start seeing the “real” results here.
After Session 3: Three rounds of PDLLA are active simultaneously. The collagen matrix is building rapidly. This is when patients start getting compliments — people notice their skin looks better but can’t identify why. The “you look well-rested” effect.
Month 3–6 post-final session: Peak results. The full collagen matrix is mature. Take before-and-after photos here for your portfolio.
Setting Patient Expectations: The “Two Waves” Script
The most effective Juvelook consultation framework uses the two-wave analogy:
“There are two waves of results with Juvelook. The first wave is immediate — you’ll leave today with more hydrated, glowing skin. That wave will settle over a couple of weeks. Then the second wave starts building — this is your own collagen growing in response to the treatment. It takes 2–3 months to fully develop, but it lasts much longer. By the time we finish all three sessions, you’ll have both the glow AND the structural improvement.”
This framing accomplishes three things: it sets a specific short-term expectation (immediate hydration), explains the “dip” between Wave 1 and Wave 2 (prevents anxiety), and creates anticipation for the long-term result (drives treatment completion).
Before-and-After Photography Tips for Juvelook
Baseline photos: Take them before Session 1 under consistent lighting. Capture frontal, 45°, and profile views. Include a close-up of the primary concern area (pores, fine lines, texture).
Progress photos: Take at each session (before treatment) and at the 3-month and 6-month follow-up. Same lighting, same angle, same distance every time.
Best timing for “after” showcase: Month 3–4 post-final session. This is when the collagen effect is at peak and the before-and-after comparison is most dramatic.
What to highlight: Skin texture close-ups show the most dramatic change. Wide-angle face shots show overall improvement in luminosity and elasticity. Side lighting reveals pore refinement better than flat lighting.
Practitioner Confidence Summary
Juvelook’s before-and-after story is different from any filler or HA booster because the visible change comes from the patient’s own collagen, not from a product sitting in the skin. Immediate hydration provides a “proof of concept” from Day 1, while the deeper collagen stimulation delivers the lasting transformation over 3–6 months. The two-wave timeline means patients see value at every stage — immediate gratification from the HA, lasting improvement from the PDLLA. For clinics, this translates to high patient satisfaction, strong rebooking rates, and compelling before-and-after portfolios. View Juvelook 50mg product details →
Frequently Asked Questions
When will I see Juvelook results?
Two waves. Wave 1 (immediate): HA-driven hydration and glow from Day 1. Wave 2 (gradual): PDLLA-driven collagen improvement building from Week 2–12, peaking at Month 3–6 after the final session. The long-lasting improvement comes from Wave 2.
How long do Juvelook results last?
Juvelook 50mg: 6–12 months after completing the 3-session course. Juvelook Volume: 12–18 months. A maintenance session at Month 6–9 can extend results. Duration varies with age, skin condition, and lifestyle. All duration data per juvelook.com.
Why did my Juvelook glow fade after 2 weeks?
That’s normal. The initial glow is from the HA component, which is gradually absorbed over the first few weeks. The collagen stimulation from the PDLLA is still building — you’ll see the deeper improvement emerge from Week 3–4 onward. This is why the full 3-session course is important.
How many Juvelook sessions do I need?
The standard protocol is 3 sessions at 1-month intervals. Each session builds on the collagen stimulation from the previous one. Some patients see satisfying results after 2 sessions, but the full 3-session course produces the most substantial and lasting improvement.
Can Juvelook be combined with other treatments?
Yes. Many practitioners combine Juvelook with toxin treatments (for dynamic wrinkles) and/or PN/PDRN skin boosters (for additional regenerative effect). However, use different injection sites or schedule treatments 2–4 weeks apart to allow proper assessment of each treatment’s contribution.
Related Guides